Would you like to advertise on this site? and/or share tips and tricks with me to add? Simply email me at j4atkinson@gmail.com for information.

To have your item featured in our weekly featured ad, let us know at j4atkinson@gmail.com.

Friday, November 21, 2008

Popping Color in a Black and White Photo

A very cool effect is popping a little bit of color in a black and white photo. When I first set out to do this I couldn't find any tips on doing it and therefore bought an action to allow me to do it. Which is great, I love the action but in reality there's a very easy way to do this. You'll want to open your original color image.
Then you'll want to make a copy of the image by clicking control + j.

You'll want to remove the color in your new image. Go to enhance/adjust color/remove color.
Now that you have a new black and white layer on top of your color layer, you'll want to select the erase tool. Pick the area that you want the color to pop through and you'll want to zoom in on that area. **To do an easy zoom, click ctrl and the + sign... to zoom out click ctrol and -.** Now that we have a bigger view of the area, start erasing. Make sure you're on the b&w layer. You'll start seeing your color pop.

Monday, November 17, 2008

Making a digi scrapbook page

One of my most favorite hobbies is digital scrapbooking. It's a little scary getting started but once you know a few basic things, it will be so easy. There are many amazing websites out there that offer free/cheap digital kits. Some of my favorites are www.heatheranndesigns.com, www.shabbyprincess.com, www.sweetshoppedesigns.com. There are hundreds of more out there, if you google it, you will find a ton.

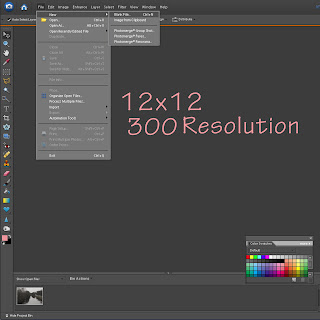
To begin you'll want to open a new document. I do my pages in 12x12 but the size is up to you. I've also done 6x6, 8x8, 8.5x11. You can do anything. You'll also want to make the resolution 300, that maintains great quality.


To move paper, pictures, embellishments, etc., to your page all you'll need to do is open your add- ons, click and hold on them and drag them to your blank file. So to start you'll want to add paper, click and drag the paper to the blank file, then the picture and then all the other elements.
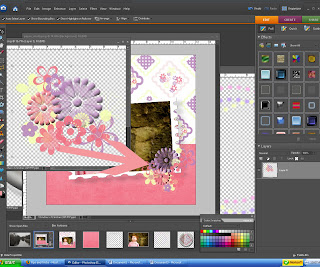
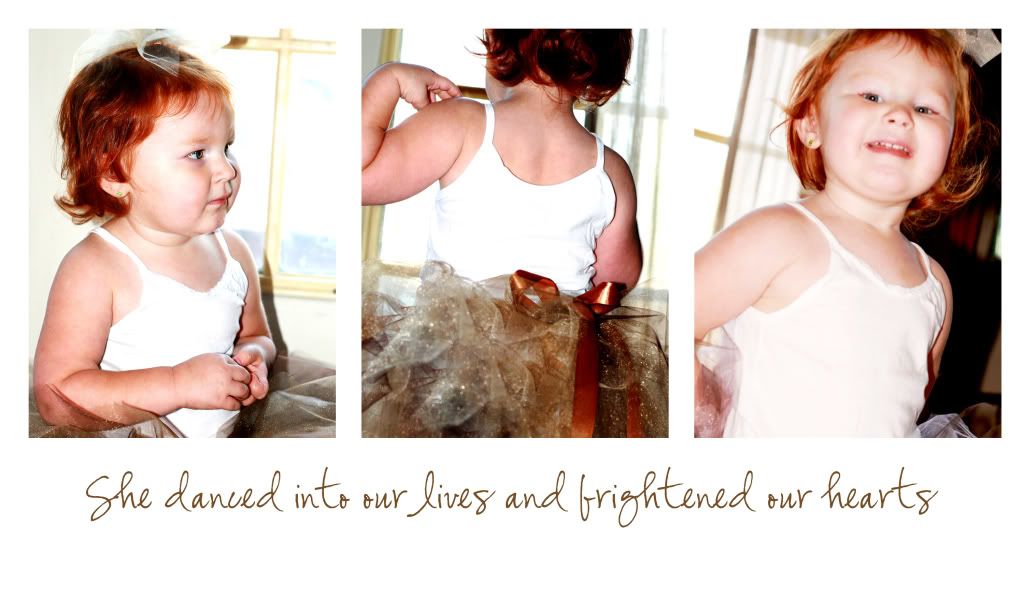
The thing that tends to terrify people the most about this is the layers. On the right hand side of the screen you'll see everything that you've added or done to that page. The layers simply tell you what's there and the order in which they are on your page. If when you're moving your stuff over and some of it is covered up by something else, like in this page, my picture is covered by a paper, all you do is go to where it shows your layers, click on the picture and drag it up so it's before the paper. You can do this with all layers on your page.

Also, as you can see on this page I didn't re-size anything before adding it to my page, that's no problem, if you click on the image to select it, click and hold on the corner square, then drag it in. This keeps it perfectly proportional but shrinks the size.
Add all your layers and there you have your digital scrapbook page.

Friday, November 14, 2008

Cloning, creating living monstrosities and cool photos

Have you ever had a great photo that you just love except for one thing? I have and lucky for us, we can fix it. I was editing photos and didn't find a good picture for demonstration so I made my own graffiti, ha. So, pretend it's real and now that it's there, let's get rid of it. ***As with all my images, to make it bigger and more easily seen, simply click on the image***

Photoshop has this amazing tool, the cloning tool. Go ahead and click on it.

Now you'll want to find a part of your photo that is what you are wanting to clone and basically replace what you're trying to get rid of. In our case, it will be the rock surrounding the graffiti. It will need to be something that is close in proximity to what we are covering up. Once you find the replacement option click alt and then left mouse click. It has now recorded what you are cloning and you are ready to click over the graffiti and watch rock show up. I like to use a small brush size but you may want to use a bigger one or adjust it as the size gets smaller.

The circle that I pointed to in this image is the brush covering up the graffiti and the + is where it is copying from. You may need to alt click a few times to move the + out of the way of the graffiti or else you will be covering up graffiti with graffiti. This may sound confusing, but I promise once you start you will know exactly what I'm saying.
We now have a picture that was pretty much useless before. How cool is that tool?!! You can use it for anything. To get rid of people, cars, poles, animals, garbage, anything.

Monday, November 10, 2008

what program are you using

If I have enough full blown Photoshop users, I will try and do double instructions, one for Elements and one for Photoshop. Let me know what you're using and I will try and help both. Also, soon I will be getting CS3 so I can add tips for that as well.

Thursday, November 6, 2008

Advice

I'd love to hear from you as to what you would like to learn in Photoshop? I have so many things I want to share but I just don't know if they are useful or what people want to learn. So leave a comment and let me know.

And for your help, one lucky person will win these digital flowers to be used while digi scrapping or for your story boards like you just learned. If you would like to purchase these flowers (in case you don't win!) email me at j4atkinson@gmail.com.

straight line

I was sharing with a friend earlier today a neat trick in Photoshop and I of course had to come here and add it. If you are wanting to do something in a straight line, i.e. brush, no need to stress over holding your hand still so you get it perfect, simply hold down the shift key while drawing your line and voila you have a straight line, it won't let you deviate from that. How cool is that!?! If you like learning little tips like this or other short keys, let me know and I will add them.

Wednesday, November 5, 2008

Story boards

I love storyboards. They are a great way to show off several corresponding pictures all together, plus a cute little saying to top it off! So let's learn how to make them. It's really, really easy and completely customizable. So let's start with a new document. I chose 10x6 but you can do any size you want.


Then we are going to want to add our squares. Add a new layer first. Then select your rectangular marquee tool on the side tool bar. We want to do a fixed size so we don't have to worry about matching up our squares perfectly. To do this, go to the top tool bar and click where it says normal in the drop down menu, switch it to fixed size. I chose 3 in x 4in but you can do whatever you want. Click on the document and you will see your rectangle pop up.

We now want to fill that area with a color. So while the rectangle is still highlighted go to Edit/Fill Selection.

A box comes up and if your foreground color isn't black, click d and that will turn your foreground color to black. Then click ok. Our rectangle is now colored in.

Now that the first one is done, click ctrl+j to duplicate it. Do that twice. Now there are three rectangles. Now you'll need to select all of them at the same time. Click on one while holding the shift key and then click on the rest of them.

Now to align them. With all of them highlighted, go to the top of the screen and you'll see an align button, click that and choose top edges. Then under distribute (right next to it) choose horizontal centers. They are now aligned and we can add pictures.

Choose the images you want to use, make your corrections and drag the first one over. Choose in your layer palette which rectangle you want your image to become (left, center or right). Move your image above that one and click crtl+g. Your image now became that rectangle. Resize as necessary and repeat for all three.


You now have a story board. You can now add a nice saying, a shape, embellishments, brushes, or leave it blank. It's all up to you. Have fun!!!


Monday, November 3, 2008

And the winners are.......

Thank you everyone who entered and everyone who gave wonderful items away. We had a great first ever gift giveaway and I don't think it will be the last.

The winners have been notified by email but will be notified again, now.

The winner of the:

Headbands - Alisha D.
mini notebook - Leslie
Christmas card - Charissa
Brooklyn's bows - Amanda S.
Sliver Chic pendant - Melissa/Missliss
Iddy Biddy Bling - Jamie
Funky Polkadot - April

Congrats to all the winners and check back often for great tips and more giveaways. There are some great tips coming and I'm really excited.